Part of The Complete Beginner’s Guide
When you buy a new plane you might think you’re getting a shiny factory-fresh model in tip-top condition, but I’m afraid that’s not the case; as a rookie you’re assigned a battered old thing that’s had several not-so-careful owners. As well as researching new aircraft, you also unlock modifications for your current planes as you fly them, enabling you to knock out the worst of the dents and service the engine for a bit more speed.
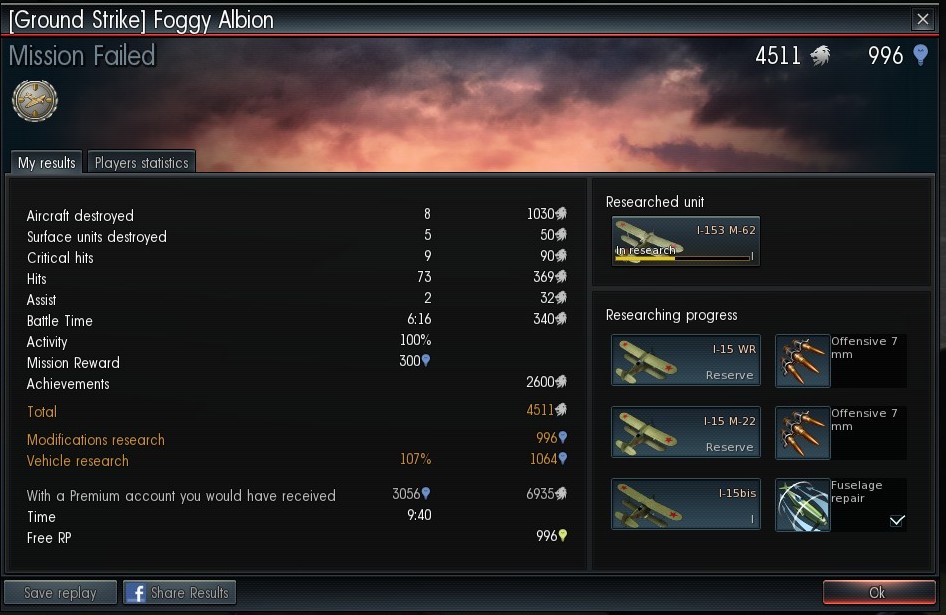
After a battle, you should have a “Researching progress” section on the results screen showing the planes that you flew, and progress towards upgrades for them:
If you’ve completed any modification research, you may have further pop-up windows allowing you to purchase that modification and to pick the next component to start researching; if you skip that window, or want to check on upgrades at any time then you can access the modifications screen for a plane by clicking the “Modifications” option (there’s a pop-up menu when you click on a plane, unlike the icons in this old screenshot):

That brings up the available weapon and upgrade options:
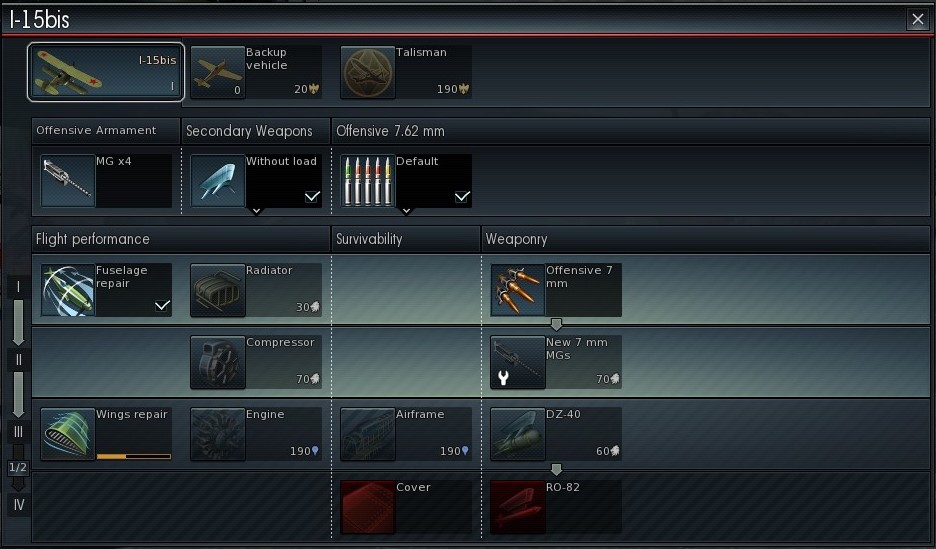
I wouldn’t worry about the two Premium options on the first row, purchased with Golden Eagles. “Backup plane” allows you to use the aircraft twice in an Arcade battle, potentially handy if you have a particular favourite but by no means essential. “Talisman” gives an RP bonus for the aircraft, worth considering in the higher ranks, but not so vital at lower levels when research comes quickly.
On the second row are the weapons: Offensive Armament (standard guns), Secondary Weapons (bombs, rockets, torpedoes, gun pods), and then the ammunition load of guns (“Offensive 7.62mm” in this instance); the precise options vary from plane to plane, the I-15bis just has one set of machine guns, other fighters can have weapons of two or three different calibres with separate upgrade options, most bombers also have turrets. For a brand new plane, you won’t be able to change any of these.
Underneath those are the upgrades that need to be researched, four tiers grouped into Flight Performance, Survivability and Weaponry. Similar to researching new aircraft, you select one of these upgrades to research, and then gain RP towards unlocking it each time you fly the aeroplane. The upgrades can be bought with silver lions (earned in-game) after you unlock them, but if you really can’t wait you can purchase locked upgrades with gold eagles (real money). Hover your mouse over a locked upgrade and a box will show the RP required to unlock it, a “Buy” icon underneath will show the cost in gold eagles to immediately purchase it. Again, I wouldn’t worry about using gold eagles on low rank aircraft. As with aircraft ranks, you need to purchase a certain number of upgrades in each tier (shown on the left) before you can start researching items in the next tier.
Citius, Altius, Fortius
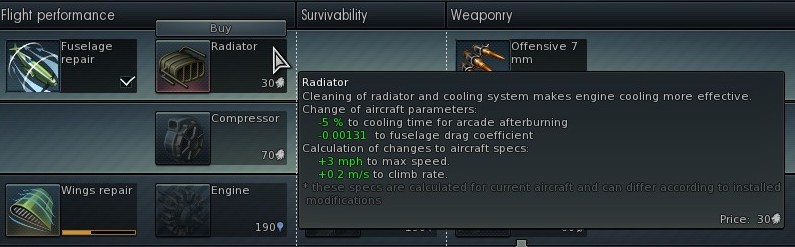
The first two groups of upgrades allow your plane to fulfil the Olympian ideals of Faster, Higher, Stronger. As the names suggests Flight Performance upgrades to components like the radiator and compressor improve the performance of the aircraft in flight, Survivability options improve your chances of surviving a battle (though really quite marginally, you get a slightly stronger and lighter airframe rather than super-adamantium armour). To see precise details, hover the mouse over an upgrade:
Radiator? I hardly know ‘or!
In this example cleaning and tuning the radiator increases maximum speed by 3mph and climb rate by 0.2m/s; it’s unlikely you’ll notice a massive difference in a fight, especially in Arcade battles, don’t be too worried about upgraded opponents having an insurmountable advantage, but every little helps. The cumulative effects of a full set of upgrades is more noticeable in Historical and Full Real battles.
Use of Weapons
The Weaponry options are less Olympian in their ideals; “Improved Air-to-Air Combat Effectiveness” isn’t such a catchy motto, even when translated into Latin (Google Translate suggested “A’ris amplio-ad-caeli certamen efficaciam”, and struggled with some of my alternative ideas like “MOAR DAKKA”). There are three main types of weapon upgrades: new guns, ammunition unlocks, and pylons.
New guns, like flight performance components, tend to grant a slight improvement to e.g. reliability or accuracy, useful but not terribly exciting.
Ammunition unlocks are what I like to unlock first, “Offensive 7mm” in the above screenshots. Once purchased you can ditch the boring Default ammunition and switch to something crazy like All High Explosive Incendiary Tracer, All The Time (note: not actual name).
Pylons allow you to fit secondary weapons to the aircraft. Most bombers start with a single default bombload, pylon upgrades allow them to carry more or heavier bombs, or alternative secondary weapons like torpedoes. Fighters usually only have guns to start with, but some have pylon upgrades for a fighter/bomber role; the I-15bis can carry 2x50kg bombs with the DZ-40 upgrade, or 6 x 82mm rockets with the RO-82. Some aircraft can fit additional cannon in gun packs as secondary weapons or change the calibre of their main weapons, but those come later so don’t worry too much for the moment.
Guns n’ ammo
Once you’ve unlocked new secondary weapons or ammunition belts you can fit them to the aircraft using the drop-down arrows in the bar at the top of the upgrade screen. Note that upgrades are a one-off cost but you have to purchase non-default secondary weapons and ammunition with silver lions each time you use them. Don’t worry too much, though, they’re not particularly expensive, and even if you go on a crazy spending spree and have no money left at all you can always equip the default options for free.
The types of ammunition available will depend on the weapon calibre and country selected. If you want to see the exact contents of an ammunition belt hover your mouse over it, in this case the Soviet Universal 7.62mm belt:

Ammunition choices depend on the country and calibre of weapon. Some weapons have ammunition optimised for air or ground targets, useful if you know you’ll mostly be dogfighting or strafing; most have a tracer option that’s very pretty but generally not so damaging, or conversely a stealth option with no tracers, damaging but makes it more difficult to visually adjust your fire. If you don’t want to worry about adjusting ammunition selection, you can’t go far wrong with Universal/Omni-purpose; it’s an improvement over the Default ammunition (the Default belts include Ball rounds, just plain chunks of metal, fine for making small holes in stuff but not very exciting compared to an Amour Piercing Incendiary round), and should be suitable for both air and ground targets.
For a bomber you might have a few choices of bombload; the BB-1, for example, can carry 12 x 50kg bombs, or 6 x 100kg, or 2 x 250kg once you’ve unlocked the pylon upgrades. Though, as per the old maxim, quantity has a quality all its own, I tend towards the other maxim that bigger is better and would opt for the 100kg or 250kg options. If you can get nicely lined up on a road packed with a column of vehicles it can be glorious to drop a long string of bombs down it, but irritatingly the enemy are seldom generous enough to lay out their forces in nice, geometric, easily bombable patterns. Small bombs (50kg/100lb) have to be very precisely placed, they do little splash damage, larger bombs give you a bit more leeway, particularly useful if you’re intending to bomb from altitude where strategic targets need heavy ordnance to destroy them.
Regarding weights, just to confuse things metric and imperial weights are used by different nations (e.g. 250lb bombs on the British Blenheim, 250kg bombs on the Soviet Su-2). 1kg = 2.2lb, so as a very rough rule of thumb you can multiply or divide by 2 to get a general idea of comparative bomb loads, or type a phrase like “500lb in kg” into Google and its handy-dandy converter will give you a more precise figure.
Choose your weapons
After you’ve kitted yourself out with new weapons and ammunition on the upgrade screen, you can change the load of your plane before going into battle using the “Secondary Weapons” and “Offensive 7.62mm” options on the initial map/select screen.
Once you have a bit of a feel for different maps and game types, you can tweak which plane you start with and its weapon load. In a Ground Strike battle you might want to start off in a fighter-bomber, head for the nearest ground targets, rattle off a few rockets or bombs, then look out for any friendly bombers who might need an escort; alternatively you could start out in a pure fighter, skip the secondary weapons for optimum performance, and climb up to high altitude in case an enemy heavy bomber is lurking up there going for your airfield or strategic targets. In a Domination battle you could start in your lowest rank fighter and have a crack at capturing the closest airfield (lowest rank so it isn’t too great a loss if you misjudge the approach and crash a bit), or pick a bomber, head for the enemy airfield as fast as possible and hope to catch one or two of the capturing team on the ground.
What do the different types of rounds do on an ammunition belt? Could this be the reason that i spend half a game shooting one target and another airplane destroys me in 2 shots?
Good question! Very brief summary, there are four main types of ammunition: Armour Piercing (makes holes in stuff), Incendiary (sets fire to stuff), High Explosive (explodes, hopefully making holes and/or setting fire to stuff in the process) and Tracer (makes pretty light trails). Many rounds combine two or more of those effects; for shooting down aircraft you generally want High Explosive and Incendiary, if available, these tend to be in “Air Targets” or “Universal” belts (“Stealth” often works well too, if you can shoot well without tracers).
For a bit more detail, Googling around a specific gun usually turns up some info about the ammunition they use, or *plug* there’s an article about the guns and ammunition of the RAF in Issue 3 of the War Thunder Community Magazine, with other nations to hopefully follow.
Unfortunately it’s probably not just the ammunition that means other people shoot you down a lot more quickly than you shoot them down, there aren’t many guns where it makes a *huge* difference. Depending on what everyone’s flying it’s quite possible they’ve got much bigger guns (e.g. the LaGG 3 and Bf 110 have big scary cannon when most other planes at their level have little machine guns), or they’re more accurate/lucky with their shooting and hitting vital bits of your plane, or you’re not hitting their plane with many shots (the network code seems pretty good most of the time, but lag/hit detection can sometimes be an issue).
I am a trained US Air Force fighter pilot and I keep stalling the Pea Shooter on every mission. I’m only using a mouse. Would a joystick be better?
Are you flying in Simulator mode? That certainly works better with a joystick; Arcade and “Realistic” mode simplify a lot for mouse control.
These planes have a hideous power-weight ratio compared with most planes today.
Absolutely NEVER try to ascend too fast; you’ll surely stall out and crash.